Latest Gear Live Videos
Custom neon signs on the cheap - DIY neon sign kit

Posted by Sparky Categories: Smart Home, Misc. Tech,
 Finally a way to add a touch of bar room class to your home: the custom blue neon sign. Rather than relying on expensive custom glass blowing and neon sign fabrication processes these ThinkGeek DIY Neon signs are made of multiple letter segments which are pre-formed at the factory which the buyer can snap together. The power supply is a hair under $30, but each individual letter is a mere $6.99. It’s not the cheapest decoration you will likely ever put in your house, but certainly cheaper than the hundreds of dollars a normal neon sign would cost.
We are thinking of picking up a ‘Gadgets4Life’ sign to adorn our wall. What will you have yours say?
Read More  | Thinkgeek via Coolest Gadgets
Advertisement
Instructables Offers Last Minute Electronic Ideas

Posted by Sheila Franklin Categories: Design, Misc. Tech, Science,
 Instructable’s annual DIY contest is going on now, and it may give you some last minute ideas for Halloween ghoulies, gadgets, and costumes. We especially liked this low-cost Lightning Globe, created by member NK5. You will need a bulb that is gas-filled, a black painted aluminum screen to attract electricity, a high voltage power source such as an old monitor, and a black plastic pot. NK5 claims that the entire project will cost about $5.00 but cautions that you had better know what you are doing to avoid frying yourself during the construction process. Check out the video for more details.
Read More  | Instructables
Digg-Me Shirt, For Those With Small Numbers

Posted by Sheila Franklin Categories: Wearables, Design, Internet, Misc. Tech, Videos,
We know that many of you are closet and frustrated digg fans who just want to get those numbers in the high digit range. Instructables’ thydzik has an answer. The DIY digg-me Shirt helps you create your own electronic counting apparel. Created with the digg-me button, instructions are given step by step, and when your project is complete, we suggest you wear it to the mall and see just how many diggs you get. Let us know and if your tee is a success, we may make some, too.
Read More  | Instructable
DIY Features Halloween Projects

Posted by Sheila Franklin Categories: Smart Home, Misc. Tech, Science,
 There are only about 3 weeks left until All Hallows Eve, so if you want to get adventurous this year be sure to check out the Special Halloween Edition from the editors of “Make” and “Craft ” for the holiday. Inside, you’ll learn how to make flaming LED skulls, laser jack-’o-lanterns, and mechanical ghoulies. You can also find makeup and a recipe for blood-spurting wounds as well as DIY coffins, tombstones, and decorations. All this (and a trip or two to Radio Shack) is available for $9.99.
Read More  | Make
Sprouting and Dehydrating Seeds and Grains

Posted by Jenni Burns Categories: How To, Grains, Vegan, Vegetarian, America, Dehydration,
Sprouting grains and seeds is easy and fun. The health benefits are well worth the extra work. You can sprout wheat berries, barley, buckwheat, alfalfa, sesame seeds, and flax seeds, to name a few. When the seed or grain sprouts, nutrients are released during the growing process that are not present in the seed or grain by itself. By sprouting, dehydrating, then grinding your grains, you are creating flour that is many times more nutrient rich than any flour you can purchase in the store. I love watching my food grow, it’s inspiring!
Step 1: Soaking
The first step is to soak the seeds or grains. Place the seeds or grains in a large pot overnight (the size of the pot depends on how much flour or sprouts you will need, keep in mind that soaking causes the grains to expand as they absorb the water).
Step 2: Rinsing
After the overnight soak, you will want to pour your grains into a colander, about half full, and rinse. When I rinse them I like to get my hands in there to mix it up to make sure that all the grains are well rinsed. Do this 2-3 times a day until the sprouts form, you want the sprout to be about 1/4 inch in length. Each seed and grain has a different germination phase. Wheat berries take around 48 hours while quinoa sprouts in as little as 12 hours.
Step 3: Dehydrating
Depending on what you are planning to use the sprouts for, you may or may not choose to dehydrate your seeds or grains. I use my sprouted wheat to make bread flour and buckwheat to make Buckwheatie Bars. Dehydrating is simple. Just give the sprouts one last rinse and place them on the dehydrating trays. It usually only takes around 4-6 hours to dry. Use your dehydrated sprouts quickly, or store in an airtight container in the refrigerator up to a month or so.
DIY Keyboard For Carpenter Geeks

Posted by Sheila Franklin Categories: Design, Peripherals, USB,

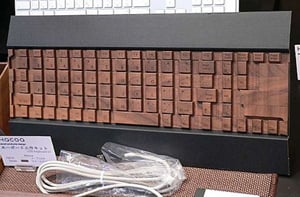
Hacoa, a Japanese company that makes wooden peripherals by hand, will soon be releasing a DIY USB keyboard kit. Announced at the recent CEATEC 2007, the Ki-Board DIY Kit is strictly for users who can use a saw and have assembly capability. We figure that since it takes the company an entire day to create one, they have decided to let us do all the work, and feel the pride while keeping Band-Aids in business. The kit will be available for JPY 34,800 (~$300.00.)
Read More  | Hacoa (translated)
Mercury, Robot Seeker of Light

Posted by Sheila Franklin Categories: Design, Misc. Tech, Toys,


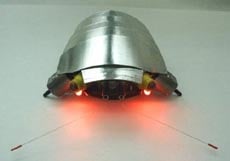
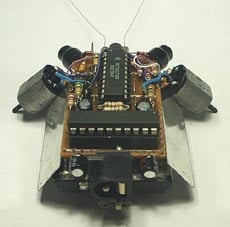
While we are on the subject of creepy things that go bump in the night, take a peek at Harold Ilano’s Mercury, named for the light-seeker. Made from an old Playstation, a Li-Poly 3.6 V cell phone battery, and a few analog components. The robotic bug zig-zags across your floor, seeking the light via its sensors, and pauses occasionally to regroup. Red LEDs were added to keep people from tripping over it in the dark and because it, in Ilano’s own words, “makes him look cool.” The designer was kind enough to post instructions if you want to make your own horde of robotic insects.
Read More  | Make
SciVee is Internet Science Fair

Posted by Sheila Franklin Categories: Internet, Misc. Tech, Science,
 If you missed out on your high school science fair and feel someone still owes you, you can now offer up your project on SciVee, a site that opened up this past weekend. Post papers and videos and be critiqued by your peers. There are also drop-down windows for data, references, comments, and a rating system. Sponsored by the National Science Foundation and SDSC’s Supercomputer Center, it will only consist of those who have been published by the Public Library of Science to begin with, but will expand to include others when the idea catches momentum.
Read More  | SciVee
DIY Solar Power Bag

Posted by Sheila Franklin Categories: Design, Misc. Tech, Portable Audio / Video, Storage,

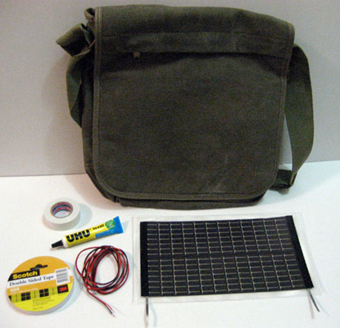
We have been showing you Solar Totes all summer, but if you assume you can do them one better at half the cost, you would probably be right. A 2-part instructional article is available to help you achieve your goal. It only takes a basic bag, a solar panel which costs about $57.00, solder, double sided tape, vinyl tape, about 1 m two-wire cable, and textile glue. The site talk2myShirt is very explicit, yet simplified in its directions and would love some feedback if you create one with their instructions. They also give tips about using your new bag and mention that they utilized theirs to recharge a complete empty iPod G5 in approximately 6 hours.
Read More  | talk2myShirt
Bleeding Edge TV 179: How To Mod Your iPhone on Windows Using iBrickr

Posted by Andru Edwards Categories: Hack Attack, Short Bytes, Apple, Cell Phones, Features, Mods / Hacks, Podcasts, Portable Audio / Video, Software, Videocasts, Videos,
Okay, we know that since Apple released the iPhone, you’ve all been wanting to modify it to do your bidding. Over on the OS X side of things, we have iFuntastic, which provides a slick GUI interface for modding your device. New to the Windows side of things is iBrickr. iBrickr is the Windows application that makes it dead simple to modify your iPhone, add and manage custom ringtones, and install third-party applications. We give you a full tutorial of how it all works in this episode.
Read More  | iBrickr
Advertisement
© Gear Live Inc. {year} – User-posted content, unless source is quoted, is licensed under a Creative Commons Public Domain License. Gear Live graphics, logos, designs, page headers, button icons, videos, articles, blogs, forums, scripts and other service names are the trademarks of Gear Live Inc.


