Find Our Latest Video Reviews on YouTube!
If you want to stay on top of all of our video reviews of the latest tech, be sure to check out and subscribe to the Gear Live YouTube channel, hosted by Andru Edwards! It’s free!
Wednesday December 21, 2005 1:59 pm
How To: Add Surround Sound To A Standard Office Chair

I’ve been needing a new computer chair for a long time now, along with new computer speakers. I finally decided to go out and get them, and as I was shopping I couldn’t help but think about the prospect of combining the purchases, with the end result being a hybrid office chair-surround sound system. Sure, they make them - but doing it yourself is a lot cheaper, plus it would satisfy the geek within. Read on for details on how to do the same.
Here is what we used for the project:
- A high back office chair
- 5.1 Surround sound speaker system for Computers (We used the Creative Inspire P5800)
- Exacto Knife/Razor Blade
- Soddering Iron or Heat Gun
- Screwdriver

The first step is to dismantle the two surround sound speakers and get them out of the casing. All speakers are different, but most simply consist of 4 screws that you have to remove. If you happen to get speakers that have the wire directly hooked into the casing, you have to get the cable out of the case. The picture above is the inside of the speaker casing where the wire goes through. It’s tough to tell, but the white blob around it is tons of hot glue. This is where the soldering iron or heat gun come in. I used the soddering iron to melt the glue and any plastic that was in the way of the wire.

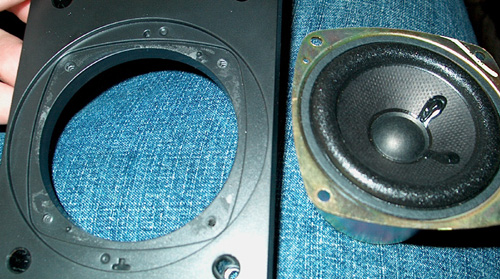
After a bit of work, we were able to use the screwdriver and soldering iron to separate the speakers from their casing, which you can see above. The next step is to prep your chair.

To make sure you cut the right size hole for your speaker, use the front facing of the speaker to trace out a circle. Using a razor blade or Exacto knife, cut the fabric away from the chair first. Beneath is the cushion. When you cut the cushion out, be sure to make that hole just a bit smaller than the circle you traced out to cut the fabric. This will ensure a snug fit for the speaker housing.

Above is an image of the speaker, now resting in the chair enclosure. Now, the method of feeding the cable is a direct result of the kind of chair you use. Since our speakers are close to the edge of the chair, we were able to easily feed the cable around to the back of the chair down to the bottom. The speakers we’re using have a smaller face plate which surrounds the speaker and attaches to the main face plate. To make the chair more presentable I attached those plates to the front of the speakers, and the end result came out pretty nice. Much better than my horrible cutting job on the PSOne LCD Mod.


Forum Discussion
Come join the discussion on this topic over on the Gear Live message boards. You need to be a member to participate, so sign up if you haven't already - it's free!